Panoramic scene is always too tempting for us to take. For
those who loves taking photos with their phones, getting panorama is just few
clicks away as most of today’s phones have the feature to do it. how about
those who use DSLR ? Well, we can always take the scene as wide as possible and
then crop it. The problem is, we will eventually lose portions of resolution
and significant details of the image. However, there is actually one simple
steps to create panorama image by using this powerful image editing software;
Adobe Lightroom. This technique basically works by merging multiple images into
one, high resolution image.
Whether you are an amateur or a professional photographer,
owning a tripod is seemingly unquestionable needs. A standard professional
tripod comes with good, sturdy built-in material, which results in big sizes
and heavy weight. Perhaps that’s what makes the manufacturer trying to invent travel
tripod; a new generation of compact and lightweight tripod which suits those
travel photographers. Although it may be not as superior as standard
professional tripod, travel tripod offers a considerable quality to meet
photographers’ needs.
For that reason, I decided to get myself one of those travel
tripods. So, I bought myself Vanguard VEO 265 AB travel tripod. Why Vanguard ? Well,
the name may be a bit unfamiliar, but actually Vanguard had manufactured a lot
of great photography gears. Also, this tripod that I bought is relatively
cheaper and has higher loading capacity compared to the other travel tripod
such as Manfrotto BeFree. I have been using it for almost a year now, and
decided to write review about it. Alright, let’s see…
Vanguard VEO 265AB
DESIGN
The VEO 265 AB is very compact and lightweight, measuring
only 15 inch (38 cm) when folded and weighing around 3,7 lbs (1,67 kg). With
this size, it is small enough to fit into luggage or attach into my camera bag
(or even some of women’s purse). This tripod adopt a very unique design, in
which the central column become the swivel point. This means that I have to
rotate the central column (instead of the legs) in order to extend it. I
personally like this design because it saves me more time to set up. The
standard central column can be disassembled and replaced with short central
column which is very useful when shooting macro or shooting at ground level.
Swivel center column design
Size comparison with 1 litre soda bottle
Fully extended tripod
The downside of this tripod is that there is no hook in the
central column. We know that a hook in a tripod is very important as it enables
us to hang our bag (or some loads) into the tripod, adding some weight to the
lower part of the tripod, thus increasing its stability greatly when used in
the field. The solution is, we can attach a carabiner in the strap hole to hang
our bag for some extra weight to the tripod.
We can attach a carabiner to this hole to hang our bag for extra weight.
Short center column for ground level shooting
LEGS
This tripod is equipped with five-section flip-lock legs
(four adjusting knobs), which, if extended, will have a maximum height of 67
inch (170 cm). The legs are thin and sturdy enough for a travel tripod
augmented with well-designed knobs. However, I feel like the knobs are quite
quite rigid whenever I want to tighten or loosen them (though it poses no
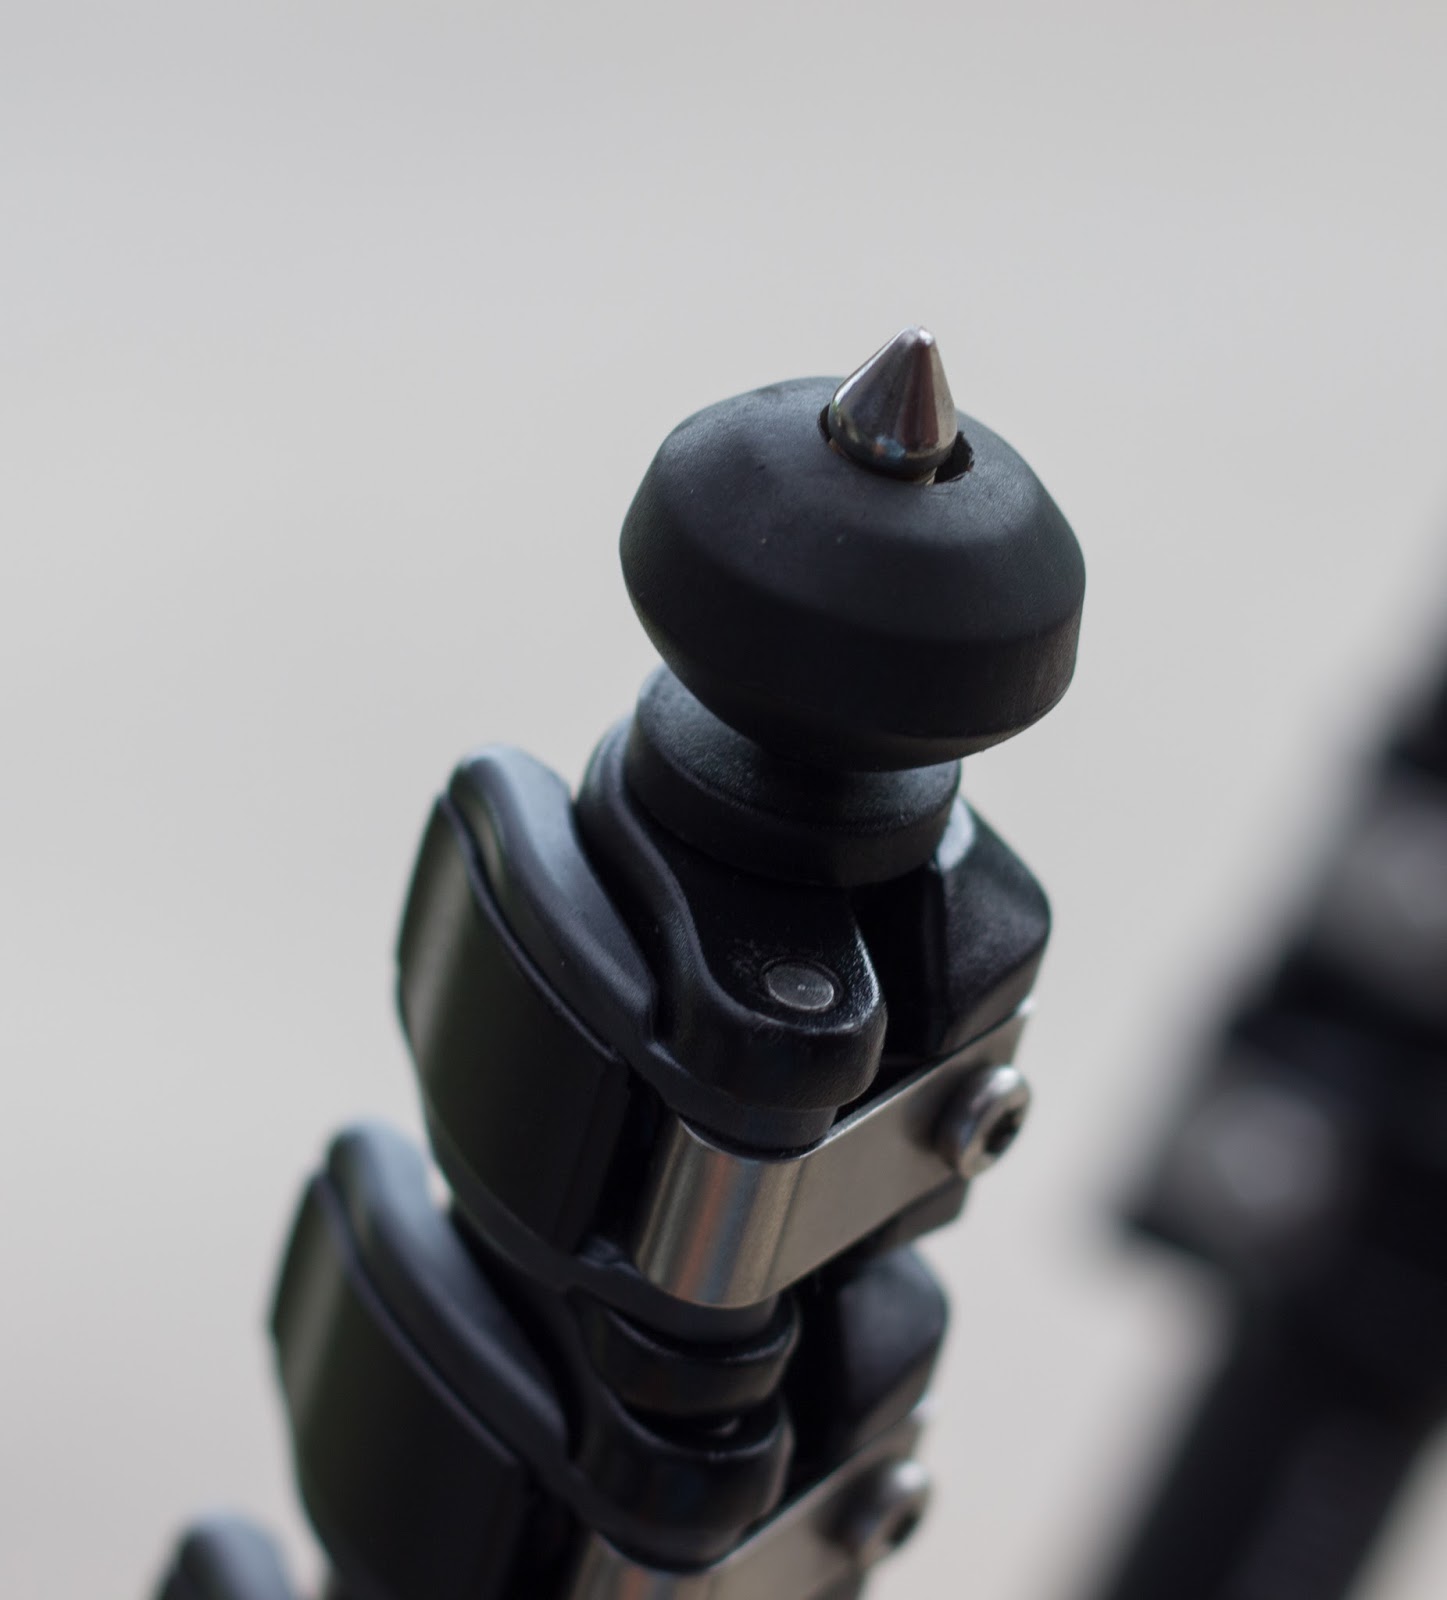
problem). The legs of this tripod are equipped with rubber feet that can be
converted into spiky feet by rotation. It is, of course, very useful when used
in slippery or rough terrain. Finally, there is a rubber grip in one the legs
which makes it easier for us to hold the tripod when it is cold or when our
hands are wet.
Four adjustable knobs
Retractable spiky feet
Rubber grip
HEAD
The VEO 265 AB is equipped with TBH-50 Ballhead with an
Arca-Swiss, which is simply a small and basic ballhead. Despite it’s small
size, it is very sturdy and precise when locked. There are two knobs; one for
adjusting the ballhead itself, and the other knob which allows us to rotate the
head (for Panning). Sadly, the mount is not a quick-release type, which may take
a little bit of time to mount/dismount our camera. Good thing is, the ballhead
itself is interchangeable, which means that we can replace it with more
advanced ballhead; such as BBH-200, if we like.
TBH-50 Ballhead
So far, I love this tripod. It is so lightweight that I
always carry it in my bag. The tripod is also pretty sturdy. I’ve used it in many terrain, from sandy field
to river stream, and it still shows a great performance (the spiky feet helps a
lot !). I have no problem with the ballhead as they works well for me. However,
there is only one spirit bubble (horizontal level only) attached to the mount.
This makes me have some difficulty when shooting vertical.
To sum it all, The VEO 265 AB travel tripod is very great
and worth the money. Although it is not as good as other professional tripod
(but of course, this one is a travel tripod anyway J), but it gives you
great performance in a compact size. It is perfect for those travel
photographers who want to keep their gear lightweight but still maintain a good
quality.
What I like :
-Reasonable Price
-Lightweight
-High Loading Capacity
-Good Material Quality
-Good Ballhead Performance
-Extra low angle option with additional
low-height adapter
-Built-in adjustable spiky rubber feet
-Compact size
What I don’t
like :
-Lack of central column hook for adding extra
weight to tripod
I love the woods, I always love them. Ever since I was a
child I always take my time to wander around in the woods or bushes nearby. As
time passed, my fondness toward the forests’ atmosphere grew. Following my
college graduation, I kept doing those kind of activities; walking in the
forests, tracking into waterfall, doing some camp, or doing some macro
photography in the bushes. So, one day I decided to do a little further by
doing some kind of solo hiking (and photography) in the mountain.
The problem is, I am a person who (currently) works for some
kind of corporation. I work eight hours a day, six days a week, so yes my job
really take my time.I could do it on sunday actually, but I always avoid going
into places during end due to traffics and crowds. So, I did some plan and
researches for more than two weeks and took some days of afterwards. Then, on
early august, I did it. I did something that (hopefully) will change my view
towards the enjoyment of life; hiking in to mount Papandayan…
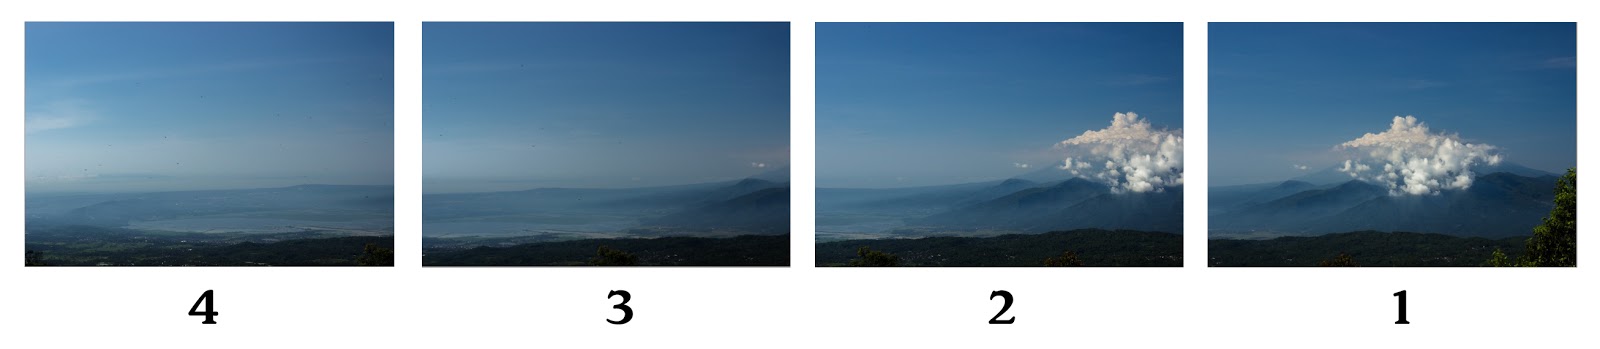
There are three main reason why chose to hike this mountain.
Firstly because it is one of the nearest mountain near my place. It took me
only three hours to get there by riding my bike. Second, it is said that the
mountain is easy to hike, even for a beginner like me. And the third, it is
because mount Papandayan is “exotic”, meaning that it has amazing landscape
view that no other mountain offer. I started doing my hike on 7 a.m. in the
morning. One thing to note is that I actually had no worry with my supply,
because there are lots of tents in the entrance which sells supplies, food,
T-shirt and even some kind of accessories (that is very common if we visit
tourism places in Indonesia). However, most of them are closed because I came
on the weekday.
the entrance
I had a very relaxing feeling when I started my hike. I was
surrounded by green, lush vegetation. However, fifteen minutes later, the
landscape dramatically changed into a barren field withsome weed growing
around. I was stunned by the landscape and never thought that I would find this
beautiful landscape. Around half an hour, I came into the crater (which becomes
the most attractive spot in this place) and decided to stop by to take the
photograph. You see, photographing the crater is actually very hard for me. I didn’t find an appropriate
foreground for my image, and I had no clue what to do with the smoke coming out
of the crater. So, I just go on, made use of my filters and get the image
which, I personally think is acceptable (it’s not great, but not bad). See my photograph in the video at the end of this page.
amazing views of barren landscape.
I continued my hike and couldn’t believe that I was the only
one walking the trail. It was some time later that I met few fellow hikers
going up/down the trail. The longer I walked, the barren landscape slowly
turned back into green vegetation. The trail was also becoming much steeper,
which very slippery if the rain came (which luckily did not). It was around one
and half an hour later that I passed the dense woods, which is a sign that I
almost arrived in my camp site.
back to the woods
I arrived in a place called “Pondok Saladah", a wide area which
is used for camp site. The area is surrounded by woods and dense vegetation of
edelweiss. In some kind occasion, we might encounter a boar here. To my
surprise, I found some tents (the ones I mentioned earlier in the entrance) up
here. They mainly sells foods and actually helps a lot for those who run out of
supply, but still it strange for me to find them. so I talked to the owner and
had a little conversation about this place. He told me that during the weekend,
this place would be packed wih hundreds of hikers ! I really felt glad that I
decided to do it during weekday hehe. So I set my camp, had some lunch, and
relaxed my legs for a while before I continue my hike.
Minutes later, I felt a not well. My head was dizzy and I
was trembled a bit, but I decided to continue because it would be a waste if I
just spending time in my tent. So I walked again for 45 minutes, and I arrived in a place called
“Hutan Mati” (Dead Forest). Yes, the forest is actually DEAD, you’ll see
nothing but dead trees and white ground as far as you can see. According to my
information, the dead forest is a result of the mountain’s eruption which
happened a long time ago, leaving an awesome landscape environment. Then I just
go on, still with no one else around, I wandered around looking for a
composition (which is NOT easy), and do some photograph (see the video).
Sadly, I’ve got a fever after taking the image. It is
perhaps due to my “unprepared” physical condition. This situation left me no
choice but to get back to my tent and get some rest. I spent the rest of the
day in my tent, recovering my body. What a shame…
I was hoping that the next day everything will get better,
so that my plan to catch up with sunrise in Dead Forest would succeed. Of course
I was recovered the next day, however, there was a heavy rain falling the
entire morning, making the area surrounded by a dense mist. I chose to wait
until the mist fade away, because it would be a bad idea walking in a condition
like that, I would easily get lost. It is when I realized that I’ve had another
problem. I ran out of the battery of my action camera due to the extensive
filming the day before (my mistake). So, everything from that morning didn’t
get recorded, how unfortunate.
the dense mist on my way back
Around 9 a.m. the mist faded a little, and the sun had
already up in the sky. So, I decided to pack my things and hike back down (I
ran out of my vacation time). I know, my hiking plan didn’t work well, but I
didn’t regret it. It was a very important lesson for me, to always plan
everything thoroughly. It was a nice, relieving walk after all, and I’m
planning to get back there when the rainy season is over J
One day, a friend of mine (who have been using Canon 600D
for a year), came to me and asked me this question : “Bro, there’s a
second-hand Canon 60D sold for cheap price, should I upgrade my camera ?”
Seriously, do we have to upgrade our camera every now and
then ? the answer is obvious : NO ! Our camera is different than smartphone (which
we upgrades almost every year lol). Our camera are long terms investation, that’s
why a periodical upgrade is not necessary. In addition, the manufacturers of
the camera only releases a new model of their products every couple of years. So
don’t be in hurry, as long as you are good with your camera, keep it.
Then, how about other photography gears ? Most people will
mention a complete list of photography gears , starting from lenses, tripods,
filters, cable releases, flashes, diffusers, tele-converters, and many others. Does
it have to be that complicated (and expensive) to start doing photography ?
Worry not, most of people’s opinions are just myths. In fact, we only need less
gears than we thought to start doing photography. Lets check this out :
1.CAMERA This one very obvious, you can’t
get a photograph without a camera, right ? J The camera I mentioned here refers to the one that
let you to set Aperture, ISO, Shutter Speed, and white balance. Why ? because
by owning such a camera, you have an absolute control over your image
processing. After all, photography is an art of light-manipulation, therefore
we are going to need a device which is capable of doing so.
There
are tons of camera out there,whether it is a digital format or film format,
DSLR or mirrorless camera, full frame sensor or crop sensor, canon or Nikon,
etc. Before deciding to buy a camera, consider to do some researches to choose
a camera which fits you, that is because you are not just buying the camera,
but also the system itself which may you use in a long-term. So, getting the
right camera for you is important. Also, consider your camera in correspond to
your needs (and of course, your budget), whether you buy it for a hobby or a
professional needs. You don’t have to spend thousands of dollar for a camera if
you just using it for a hobby. As for myself, currently I’m using a DSLR camera
with a crop sensor, and it fits me well because I found that digital format is
easier and more suitable for me.
Full-frame (Left) & crop sensor (Right). Besides the difference in their sensor size,
Full-frame camera tends to have more feature, which usually used by the professionals.
.2.LENS Lens holds an important
key to your photograph. In fact, lens have more significant (compared to the
camera itself) effect towards the sharpness of your image. Imagine your brain
as the camera, and your eyes as the lens. No matter how good your camera as
long as it does not supported by a good lens, it would be pointless. That’s why
some lenses are way more expensive than the camera itself. There are lots of
lenses sold in the market with their own specification, such as; wide angle
lenses, prime lens, tele-photo lens, all-around lens, macro lens, even
tilt-shift lens. Each of those lens has their own specialization with their
range of focal length. Some people may choose an all-around lens (for example :
Canon 18-200 mm) due to its large range of focal length, meaning that it can be
used both for landscape and tele-zoom photo. Well, there is nothing wrong with
that, however I would highly recommend you (if you have spare money) to buy
each of specialized lens instead of buying an all-around lens. For example, you
are going to need Canon 18-55 mm for shooting landscape, Canon 50mm for
portrait, and Canon 70-200mm for telephoto. That way, you’ll get an optimized
photograph. Again, do some
research before buying your lens ! This is because lens have their own
compatibility with certain cameras. It also should be noted that lenses’
manufacturer produce the lens that fit with their respective camera, which
means, you can’t use Nikon’s lens on Canon’s Camera. Also, consider whether
your camera is a fullframe camera or crop sensor camera, because it will affect
the mechanism of your camera.
3.TRIPOD
“Do I really need a tripod ?”
Yes, you REALLY
need one, at least if you want to get the long exposure images (see the sample
below). Tripod also helps you a lot in a low-light situation, where slowing
down the shutter speed is the only option. No matter how skilled a photographer
is, their hand will not get steady in shutter speed setting slower than 1/50s, which
will result in a blurry images. That’s why I’m saying that a tripod is a must,
you may not use it everytime, but you definitely NEED it. It’s fun to own a
tripod anyway, because you can experiment with long exposure effect (as I
mentioned earlier). Tripods open a whole new world in your photography.
the images above are samples of long exposure effect which can only be achieved by using a tripod !
One thing to note when buying a tripod is its
material; a Carbon-fiber tripod is lighter than an Aluminium tripod, however it
is more fragile and more expensive. Also, consider the dimension of the tripod.
Travel tripod have a compact dimension compared to standard professional
tripod, making it easier to carry during your travel.
one of travel tripod from Vanguard. Although it is very compact,
it's quality is on par with those professional tripods.
It is also
important to consider the head of the tripod; whether it is a ball-head or
pan-head. Ball-head has simpler mechanism, resulting in an easy use and more durability,
while Pan-head is great for panning,
panoramic, or video shooting. Notice
the mounting of the head, whether it has a quick release system or not. It is
not a must, but having a quick release system helps you a lot (save more time)
when mounting or dismounting your camera. There are so much to consider, huh ?
Ball-head (Left) dan Pan-head (Right), Notice the differences in their mechanism. each of them has their own pro and cons.
Please don’t buy Chinese
branded tripod, just don’t. I bought one those Chinese tripod for Rp.500.000 ($
38 or so), because I initially thought that I need a “tripod for beginner”
which is not too expensive. It was then I realized that the quality was horrible,
and it made me angry everytime I used it. Four months later, it broke and could
not be used anymore. That’s when I decided to buy a “real” tripod. You see, it
is better to spend more money on a good quality tripod, because we can use it
for a long time period. Some brands which can be your preference are; Manfrotto,
Benro, Gitzo, Giottos, Sirui, Vanguard,
and many others.
Avoid buying this kind of tripod !
Their quality is far from acceptable, and they are very easy to break.
Believe it or not, that’s all we
need, Everything else is optional. You don’t have to get packs of gears to
start your photography. So, go get your money and spend it well on your gear J
What is Exposure
Triangle ? Is it related to Bermuda Triangle and Golden Triangle ?
Well, of course not :D. For those of you who are into
photography must have heard the term Exposure Triangle very often. It is quite
understandable though because Exposure Triangle is actually the very foundation
in photography. Therefore, basically it’s the very first thing you’ll have to
understand before anything else. I hope my explanation below will give you an
understanding about the term.
So,
what the heck is Exposure Triangle ?
The term Exposure itself actually
refers to the composition of an image. As we know it, an image is created
because the light is collected by the lens, translated by the sensor, and then
saved as a photo. This Light-collecting process is what becomes the value of an
exposure. If there is less light collected by the camera, the image created
will be dark (under-exposure), and if there is more light collected by camera,
then image will appear brighter (over-exposure). Look at the samplebelow :
Some people asked me this question quite often; What
is Macro photography ? Well, it is of course a field of photography which,
technically produces 1:1 magnification of the objects. In other words, the
objects you photograph will appear exactly the same size in your camera’s
sensor. Feeling confused ? it’s alright though because the concept of Macro is
quite complicated. I’m not going to give
you any tutorial or technique regarding Macro photography in this essay
(tutorial on how to do it will be given in the future post :D). I’m just going
give you the very basic introduction about macro photography and why you should
try doing this field of photography.
Normally, when we photograph an object, the reflection of the
object which enter the lens will be shrunk in the sensor (as in the picture
below). However, using dedicated macro lens (or other macro technique), the
reflection of the object will magnified at 1:1 or life-sized, giving the image
much more detail and magnification. Because of this,
Having a
three-days holiday means that I have to do some photography trip. There are
some places in West Java that I really wish to visit. So, with strong
determination I planned my trip with the following schedule;
Day 1 : Get
sunrise in Argapura terrace ,and visit Curug Puteri (Puteri Waterfall),
Day 2 :
Visit Galunggung Mountain, and Curug Dengdeng,
Day 3 :
Visit Telagabodas crater, and getting back home.
On May 5th,
I got my bike and started my trip. Unfortunately, due to traffic (caused by
holiday season), Rainy weather, and other technical issues, the only place I
could visit was Galunggung Mountain. It was so unfortunate that I could not
manage to fulfill the plan, but hey, at least I tried and it was not a complete
failure anyway :D
Traffic during holiday
Galunggung
mountain is perhaps one of the most beautiful mountain in West Java. In ancient
times,